7 Ways to Benefit from Using wordpress
Ease of use: It’s never been easier to install WordPress and start a website without the need to hire a web designer. Adding new content and customizing your website to your own unique style has also never been easier.
Valuable feedback: Comments & feedback are a valuable source of information your readers & prospective customers give you that you can use to improve in many ways.
Complete Control: When you own your own WordPress site, you totally control all the content on your site and build your trust & authority on your own unique address on the web.
Increase Traffic: Increasing traffic to your website increases readership and helps build your brand. Blogging with WordPress allows you to connect with the right readers which have a need for your solutions and services.
Social Media Connections: WordPress integrates perfectly with social media enabling you to easily share new content with like-minded individuals across hundreds of different social media networks across the entire worldwide internet.
Cost-Effective Marketing: Adding blog posts helps drive targeted traffic to your commercial website at a minimal cost. Getting started with WordPress only costs you about R199 a year and the content you add brings new readers to your site for a lifetime.
Content Distribution: WordPress offers many ways to distribute your content to your readers as well as gain new readers globally. RSS is a free service that automatically updates your readers with new content every time you add a new blog post.
Companies that blog, average 55% more website visitors and up to 88% more leads per month than those who use a static website.
Installing WordPress
In the good old days, the only way to install WordPress was to download the software and upload the files to your server.
These days, installing WordPress is far easier. If you’re not technically minded, I suggest you either:
Use our free setup service for WordPress or
Choose a hosting plan which offers a simple one-click installation tool from Cpanel and installs WordPress automatically.
Log in to your web hosts cPanel and scroll down to Software/Services and locate the WordPress icon (Circled in Orange below)
Once you’ve clicked the WordPress button you’ll arrive at this screen below.
—-
Click the Install button to install the latest version of WordPress. If you get stuck and need technical assistance, try these support forums.
New Perspective Design is a top recommended web hosting provider for WordPress.
Installing WordPress with Marketplace (Legacy)
- Log in to your New Perspective Design cPanel account.
- Find the Website section and select Install WordPress.
- Click the Install button.
- Choose the domain name to install it to. In the field next to the domain, you can enter a subfolder such as ‘blog’ or leave it blank if you want the site’s main page to be the blog.
- If necessary, you can edit the email address, username and password for the new WordPress installation. Click “advanced options” and you can change those settings.
- Read through the license and service agreements and check the boxes.
- Select the Install Now button.
Installing WordPress with My Sites
- Log in to your New Perspective Design cPanel account.
- Open the My Sites tab from the side menu on the left.
- Click on the Create Site button.
- Enter the Site Name and Site Tagline.
- Click Next.
- Select the domain you wish to install from the drop-down list.
- Choose the directory this should be installed to, and click Next.
After Installation Tips
Once you’ve successfully installed WordPress, there are several after-installation tips that will guide you through the best way to setup your site the right way the first time. Firstly you’ll need to login to your Dashboard. If you cannot find the link to your login page, type your website address and add /wp-login.php at the end.
——
Example: http://www.example.com/wp-login.php
This should take you to your login page where you can enter your username and password.
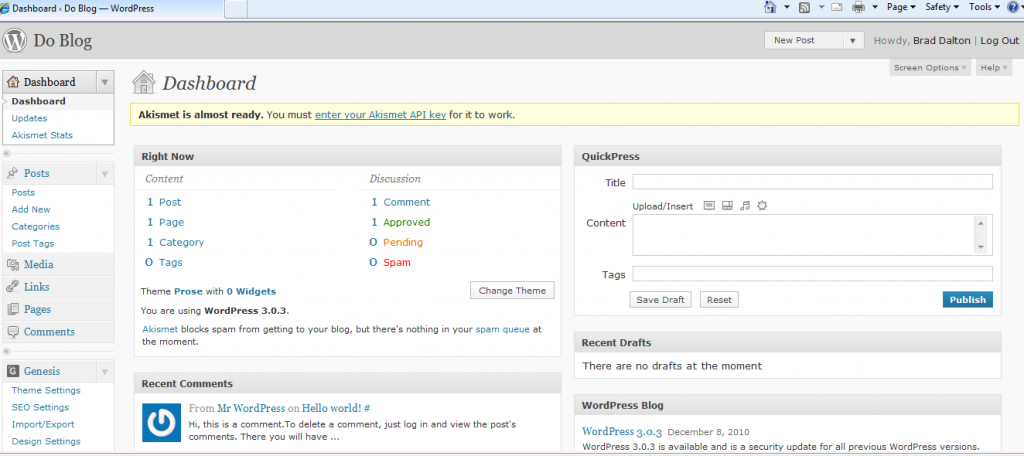
Login and you will see your Dashboard which looks like this.
Getting Started With WordPress
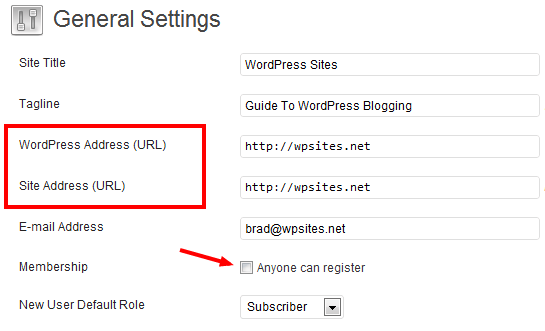
Scroll down to settings in the left sidebar and under Settings, click on General.
The first step is to enter your Site title and Tag line. I recommend you use keywords that are relevant to your site content,
topics, and categories. This will ensure better search engine indexing and a consistent stream of new visitors to your site.
The 3 most important settings after your site title are:
Leave the Membership box (Anyone can register) unchecked. This will
help stop automated spammers from leaving bad links on your site.
Don’t change the WordPress Address (URL)
Don’t change the Site Address (URL)
Change Permalink Settings
This step is one of the most important to setup the right way before you do anything else.
It is strongly recommended to change these settings to a Custom Structure before you create any pages or posts.
This way you can still use categories but they won’t be included in your permalinks so you can easily change and consolidate them if needed without breaking all the linked pages.
Any of the permalink settings in the screenshot below are fine to use as long as you don’t use the Default or Numeric.
Your WordPress Profile Settings
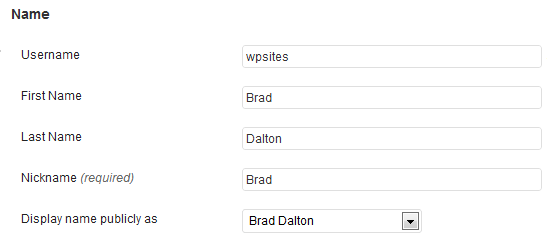
Biographical Info will appear at the end of each post if your theme offers an author box as long as you enter your Bio information in the Users field. Go to Users > Your Profile and enter your Bio and user details including contact information.
This gives your readers some info on the author whether that be yourself or a guest author.
It’s also a good idea to change the public display name in the drop-down so it’s different than your username.
Change Your WordPress Password
If you haven’t already, choose a long password of more than 10 digits including lower & uppercase letters, numbers and symbols.
This will help protect your site from being hacked.
Example of a strong password: !BR0)CI7HUDF$
Example of a weak password: fish89
Discussion Settings
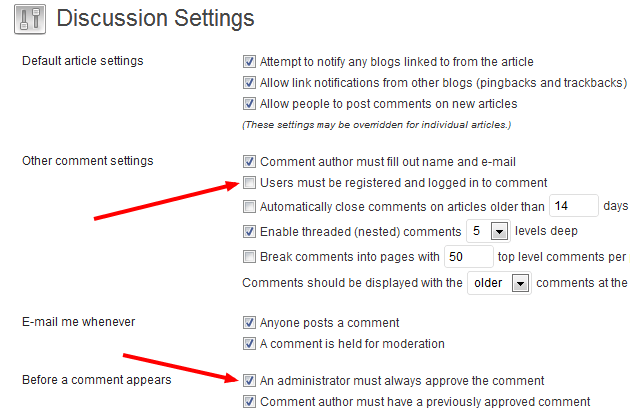
The 2 most crucial settings are:
1. Other comment settings – Users must be registered and logged in to comment (Uncheck). If you check this box and allow anyone to register before they submit a comment you leave yourself open to automated spammers who will leave thousands of links in your blog.
2. Before a comment appears – An administrator must always approve the comment (Check). If you leave this unchecked you’ll find thousands of automated spammers leaving links in the comment field.
Setting up your discussion settings immediately after installing WordPress is essential.
Spam can be a major problem for bloggers.
If you configure your discussion settings correctly, you will never have to worry about comment spam.
WordPress Plugin Installation
Plugins are little software programs that add additional functions to your website.
They are like add-ons or extensions which enable you to create any type of website you like.
Some examples of what plugins enable you to do are:
Create an eCommerce website with a shopping cart
Create a membership site
Prevent and avoid comment spam
Secure your website from hackers & backup your site
Some of the best plugins you should consider installing after installing
WordPress are:
Jetpack
WooDojo
Related Posts
Wordfence Security
Akismet
BackupWordPress
We all love plugins but it’s becoming a bit like finding the needle in the haystack don’t you think?
The reason being, there are over 32,000 now which makes it a fair challenge for anyone to find the best one’s.
When I mention the best, I mean plugins you must have so you’re fully covered with all crucial installation settings and don’t miss anything that gets in the way of running a successful blog.
Regardless of what theme you are running (because i really have tried the best) here’s a list of plugins you really must install if you’re new to WordPress.
Jetpack
This plugin is built and maintained by WordPress themselves and enables you to take off whenever someone posts a nasty comment right? Wrong, its a plugin that includes many other plugins that you can enable or disable at any time.
- Subscriptions – Build your list from the very start and auto send beautiful emails to your subscribers that look professional.
- Contact Forms – Very impressive looking, easy to customize contact forms that run submissions through Akismet so you don’t get any spam. You also don’t need to install an anti captcha plugin which can annoy your readers who wish to contact you.
- Akismet – The world’s best anti comment spam plugin made by the company behind WordPress, Automattic.
- WordPress.com stats – Another great feature built into Jetpack which makes it super easy to learn about stats before you dig deeper into Google Analytics.
- Gravatar Hover Cards – Personalize your posts and create an avatar so your face is displayed next to every comment you make on every blog. Hover cards pop up when someone hovers over your Gravatar image and displays a small Bio of the author which is linked to the profile on the Gravatar site.
WooDojo
Developed by Woo, this plugin, in principle, is a bit like Jetpack as it includes a range of other plugins which you can enable or disable when needed.
- Custom Menu’s – Did you know you can easily use a different navigation menu on any page or post? Simply create as many custom menu’s as you need and select which ones you want to display on which posts or pages.
- Tabbed widget – Very popular way to display different links for popular & latest posts with thumbnail images, comments, tags etc.
- Woo Sidebar Manager – Easily display different sidebars with different widgets on different pages and posts
Also includes social widgets, login branding, short links, and custom code.
Related Posts
Here are 3 of the most popular related posts plugins to choose from.
- Related Posts Thumbnails – This is one of the best plugins for displaying related posts with thumbnails after your posts
- Yet Another Related Posts Plugin – This is the most popular if you want to display a list of links after your posts.
- WordPress Related Posts – This plugin pulls the data from WordPress.,com stats and works out related posts that way. You’ll need Jetpack installed to use it as it includes WordPress.com stats.
WP Super Cache
The world’s most popular caching plugin speeds up your site and improves page loading times. This plugin is co-developed by the company behind WordPress, Automattic.
Another great caching plugin for the more advanced is W3 Total Cache.
WordPress Seo by Yoast
The only true all in one Seo plugin for WordPress. It’s the best hands down and it’s free.
The world’s best Seo software company, SEOMoz has written an extensive guide on how to set up this plugin which has been acknowledged by Yoast as better than his own setup guide.
Includes everything you need like sitemaps, redirects, etc.
Wordfence Security
The best all in one security plugin for WordPress users covers the most crucial bases to protect your site from anything nasty.
Here’s just some of what you’ll get:
- Alerts via email when someone tried to hack into your site
- Scans for malicious software
- Login security to prevent brute force attacks
- Live traffic stats so you can check out who’s on your site and what I.P address they come from
WordPress Backup to Dropbox
This plugin creates a full backup of both your files and/or databases.
WordPress Backup to Dropbox is a plugin that automatically uploads a backup of your files and database, to Dropbox.
Choose a day, time, and frequency you want your site to be backed up and this plugin will send it to your Dropbox account.
Installing a WordPress Website Theme
One of the best features of WordPress is using themes.
A theme changes the appearance, look and feel of your site as soon as you install it.
As soon as you install WordPress, you’ll also install a theme which is currently named Twenty Eleven.
It’s a free theme that you can customize to your own styling preferences once you learn how. Or you can hire a web designer to do this for you.
Another option is to find and install another theme
Changing Themes
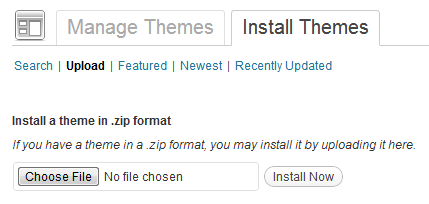
Login to your WordPress dashboard and navigate to Appearance > Themes > Install Themes and search for a free theme using the search box.
You can also upload a premium theme then activate it from this location also.
It’s advisable to install a premium framework (If you can afford it) when you’re first getting started with WordPress.
This way you avoid the pitfalls of changing themes like loss of SEO settings, formatting problems, and many issues that can be caused when you change themes.
Avoiding Common Mistakes
Setting up WordPress the right way the first time is easy in hindsight, not when you’re a beginner. Here are some of the most common mistakes beginners make and solutions of how to avoid them.
Width of Content Area
Your site visitors will find it easier to focus on your content if they don’t need to read from one side of the screen to the other. It’s best to try and keep your content area between 500-600 pix max for this reason. Changing the size of your content area after you have already written hundreds of posts and inserted images and videos can be a lot of work and very time-consuming.
Featured Images
Generally, your blog page or home page which displays a list of your 20 most recent posts also includes a featured image. If it doesn’t, your theme may include a function you can use for a generic image if you haven’t set a unique one that paints a picture of each particular post. Unique images which are pleasing on the eye should be descriptive of the content of each post to attract targeted traffic to your site. On top of this, Google images will index each featured image and send you free traffic. If you don’t design & include a featured image for your posts, it can be very time consuming to go back and find or create an image for this purpose.
Image ALT Text
When you insert an image in a post or page, you also have the opportunity to add some text which displays if the image doesn’t for some reason.
15Getting Started With WordPress Another benefit of adding what is called “ALT Text”, is that it will optimize your images to rank higher in the search engines as they can’t read images. This will help bring more traffic to your site and create better-optimized content. If you don’t add ALT Text from the start, going back over hundreds or thousands of images can be a huge job that isn’t much fun.
The Correct Sub-Heading Size
Subheading within your content help break up large chunks of content into more specific bite-size chunks of information. If you don’t use the correct size for your subheadings, it can be a lot of work to go back and change them all. Another benefit of using the right size is search engine optimization. Your subheading shouldn’t be larger than your post/page title’s size or be smaller than bold text.
xxx
Use h2, h3, and h4 heading sizes. As the number gets bigger, the size of the subheading should grow smaller as well as the focus on the content under that sub heading.
Paragraph size
Your site’s readers generally scan your content for the exact information they are looking for or for a headline or image that draws them in. Most of your readers will find your content more attractive if it’s spaced out with paragraphs that are around 2-4 lines max. Big chunks of text are not attractive and look like hard work to read therefore will be avoided. Make it easy for your readers. It’s a lot of work to go back over hundreds of posts and make your posts more scan-able if you have large chunks of text that require your readers to concentrate heavily in order to understand what you have written.
Tracking & Shortening Links
Many people start a blog to drive traffic to their website and make money online using affiliate programs. The owners of the products and services you choose to promote tend to change the affiliate software or manager they use for their program, many, on a regular basis. When this happens, most of the time your links will not continue to be tracked and even fail to work altogether.
The best way to avoid having to go back and find the posts which contain your affiliate links is to use a link manager plugin. You can choose to use a free link-shortening service like Bit.ly or Goo.gl however it still requires you to change these links when the affiliate program changes managers.
Therefore it’s best to use your own self-hosted link management tool or plugin where you can simply change your links within the interface of the tool rather than find each link individually. Control your links using your own tools rather than allow a service to control them for you because that can be very dangerous.
Short codes
Shortcodes enable you to easily add different types of styling to your content area without having to write, add, and/or edit code to your theme’s files.
Many themes now include shortcodes which is great for beginners, however, be warned.
Some theme developers use code which only works with their themes and stops working if you decide to change your theme down the track. If this happens, the styling you added to your posts and pages will not work and the shortcode you inserted into those pages will also stop working and look very unprofessional.
The best solution is to add the CSS and PHP functions code that creates shortcodes to your child theme manually or use a plugin for shortcodes. If you want to create your own shortcodes, make sure the code isn’t specific to your current active theme and can be used on any theme.
Keyword Density
If you don’t have any experience with search engine optimization then it may be hard working out how often to use different keywords in your content. There are some great free SEO guides for beginners that will educate you with best practices when optimizing your content.
If you make the same mistakes over and over again on all your posts, it can be very time consuming to go back and fix all these problems manually. Another option is to install a keyword density plugin and try and keep your density below 5% in order to avoid a penalty from the major search engines like Google.
Categories & Tags
I’ve already written about creating categories and tags in WordPress. If you create dozens of categories when you first start and only add one or 2 posts to each category, it’s not effective and difficult to change. If you delete unused categories, you’ll also suffer from broken links which can be a nightmare to fix and create a giant mess in your database.
When creating tags, keep in mind they should be used to group similar content together and you shouldn’t use more than 2-3 tags per post max. Your posts should focus on one topic and not include content that’s not related to the title of each post. Only assign each post to one category. If your content covers other categories, then it’s not focused on one subject, and/or you’ve created too many categories.
Content Scraping Splogs, are spam blogs set up to automatically copy your content from your RSS feed and display it on some else website. The reason people do this is to automatically generate posts to increase traffic to their site which generally contains lots of advertising. You can prevent this from happening by configuring your reading settings to only display a summary of your posts and a link back to your site.
Unique, Useful, Relevant Website Content
The most successful WordPress websites & blogs are always adding new content.
The search engines like Google send you the most amount of free, targeted traffic in exchange for adding unique, useful & relevant content to their index. It can be easy to conduct research on your competitor’s sites and look to your niche for ideas however this normally produces similar content. Base your content on your own personal experience about what you do best.
You’ll stand out from the crowd much more if you put all your cards on the table and speak your mind in a professional manner. Adding more value from a different perspective extends the existing content which has already been written about and discussed


